Easy Homemade Garlic Bread With a Crispy Edge
Mastering an easy Homemade Garlic Bread With a Crispy Edge is the secret to elevating any weeknight dinner from ordinary to memorable. By focusing on the interplay between soft, buttery centers and edges that shatter upon the first bite, you create a side dish that outshines the main course. This process relies on high-heat baking and the right fat-to-herb ratio to ensure every slice is perfect.
Whether you are serving a simple pasta night or hosting a weekend gathering, this method delivers reliable, golden-brown results every single time. You will find that making this kitchen staple at home is far more rewarding than relying on store-bought frozen versions.
- Prep time: 15 minutes
- Cook time: 30 minutes
- Total time: 45 minutes
- Servings: 4
- Calories: 420 per serving
Ingredients
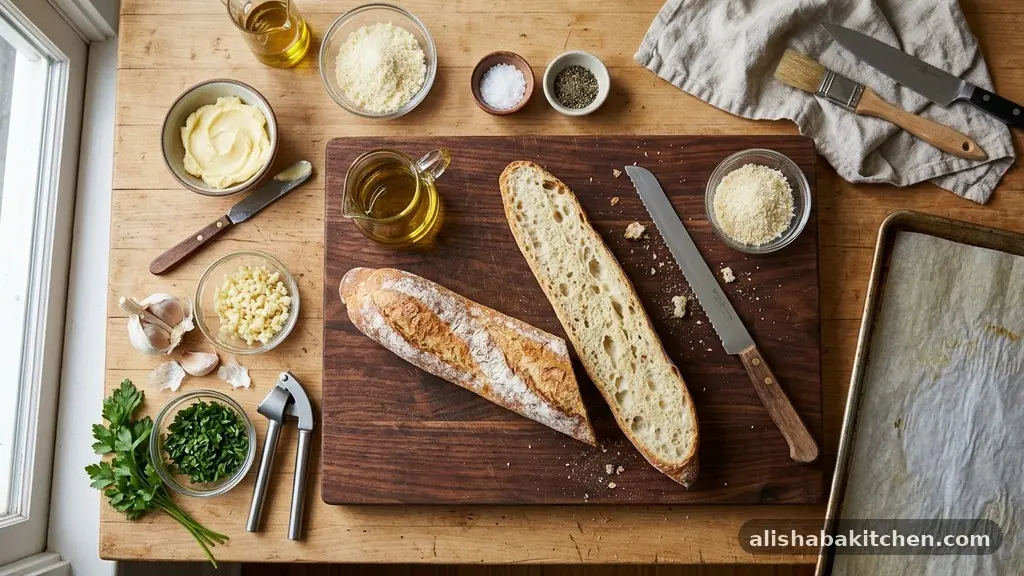
- 1 loaf of crusty French bread or Italian baguette
- 1/2 cup unsalted butter, softened to room temperature
- 4 cloves of fresh garlic, minced or pressed
- 2 tablespoons fresh parsley, finely chopped
- 1/4 cup freshly grated parmesan cheese
- 1/2 teaspoon kosher salt
- 1/4 teaspoon cracked black pepper
- Optional: 1/4 teaspoon red pepper flakes for a subtle kick
Instructions
- Preheat your oven to 400°F (200°C) and line a large baking sheet with parchment paper to prevent sticking.
- Slice the bread loaf in half lengthwise, then cut those halves into smaller portions if preferred for easier handling.
- In a small mixing bowl, combine the softened butter, minced garlic, chopped parsley, salt, pepper, and red pepper flakes.
- Mash the mixture with a fork until it becomes a smooth, uniform garlic butter paste.
- Spread the butter mixture generously over the cut sides of the bread, ensuring you reach all the way to the outer crust.
- Sprinkle the grated parmesan cheese evenly over the buttered surface, pressing it gently so it adheres.
- Place the bread cut-side up on the prepared baking sheet.
- Bake in the preheated oven for 12 to 15 minutes, or until the edges are deep golden brown and the center is bubbling.
- For a truly crispy edge, turn the broiler on for the final 60 to 90 seconds of cooking, watching closely to prevent burning.
- Remove from the oven, let cool for two minutes, and slice into thick pieces before serving warm.
The Science of the Crispy Edge
Achieving that signature crunch is about managing moisture levels during the baking process. When you use softened butter rather than melted, you create a barrier that prevents the bread from becoming soggy.
The fat helps toast the surface of the crumb, effectively frying the edges while the interior stays soft. You can learn more about baking principles to understand how heat transfer affects crust texture.
High heat is essential for this transformation. If your oven temperature is too low, the bread will dry out before it browns. By starting at 400°F, you ensure the exterior develops a golden color quickly.
The addition of parmesan cheese also contributes to the crunch factor. As the cheese melts and toasts, it forms a savory, crispy crust that protects the bread from drying out entirely.
Selecting the Right Bread
Not all loaves are created equal when it comes to a homemade garlic bread recipe. You want a bread with a sturdy structure and a thick crust, such as a traditional French baguette or a rustic sourdough loaf.
Avoid overly soft sandwich breads, as they lack the physical integrity to hold up under the weight of the garlic butter. A tighter crumb structure ensures the butter stays on the surface rather than soaking through and making the slice limp.
If you are using a loaf that is slightly stale, that is actually a benefit. Stale bread has a lower moisture content, which allows it to toast faster and crisper in the oven.
If your bread is very fresh, you can leave it out on the counter for an hour before slicing. This simple step helps the bread maintain its shape and texture during the baking process.
Flavor Enhancements and Variations
While the classic version relies on garlic and parsley, you can easily experiment with different herbs to customize the flavor. Fresh rosemary or thyme provides an earthy aroma that pairs beautifully with the intensity of the garlic.
If you prefer a richer flavor, add a splash of olive oil to the butter mixture. This addition lowers the burning point of the butter slightly, allowing for a longer, slower toast if you prefer a crunchier center.
For those who enjoy a sharper profile, consider mixing in a teaspoon of lemon zest. The acidity cuts through the richness of the butter and highlights the freshness of the garlic.
You can also incorporate other cheeses like pecorino romano or aged provolone for a different depth of saltiness. These small adjustments turn a basic side dish into a sophisticated accompaniment to any meal.
Troubleshooting Common Mistakes
The most common issue when making this dish is burning the garlic. Garlic burns quickly at high temperatures, turning bitter and unpleasant.
To avoid this, ensure the garlic is thoroughly mixed into the butter so that the fat provides a protective coating. If you notice your edges browning too fast, you can tent the center of the bread with aluminum foil while leaving the edges exposed.
Another frequent error is using cold butter, which is difficult to spread evenly. Trying to force cold butter onto soft bread often results in tearing the crumb, leading to uneven cooking.
Always take your butter out of the refrigerator at least 30 minutes before you intend to start. If you are in a rush, you can soften it in the microwave for five seconds, but be careful not to let it melt completely.
FAQ
Can I make this ahead of time?
Yes, you can assemble the bread entirely, wrap it tightly in plastic wrap, and store it in the refrigerator for up to 24 hours. When you are ready to eat, simply unwrap it and place it directly on the baking sheet. You might need to add an extra two minutes to the total baking time to account for the chilled temperature of the ingredients.
How do I keep the bread from getting too hard?
If you find your bread is becoming too crunchy, reduce the oven temperature to 375°F and bake it for a slightly longer duration. Covering the loaf loosely with foil for the first 10 minutes of baking also helps trap enough moisture to keep the center tender. Remove the foil for the final few minutes to achieve that desired golden, crispy edge.
Can I use dried herbs instead of fresh?
You certainly can, but keep in mind that dried herbs are much more potent than fresh ones. If you are substituting, use about one-third of the amount called for in the recipe. Rub the dried herbs between your palms before adding them to the butter to help release their essential oils and maximize the flavor.
Is it possible to make this in an air fryer?
The air fryer is actually an excellent tool for this dish because the circulating air promotes a very crispy texture. Cut the bread to fit your basket and cook at 350°F for about 5 to 7 minutes. Keep a close eye on it, as air fryers cook much faster than conventional ovens and can burn the garlic in seconds.
What if I don’t have a baguette?
Any crusty bread will work, including ciabatta, sourdough slices, or even a split loaf of Italian bread. If you are using pre-sliced bread, just be sure to watch the oven time carefully as smaller slices will brown much faster than a full loaf. The quality of your bread is the most important factor in the final texture, so choose something with a good chew.
Conclusion
Creating an easy Homemade Garlic Bread With a Crispy Edge is a simple way to bring professional-level comfort food into your home kitchen. By selecting the right bread, managing your oven temperatures, and balancing the flavors of fresh garlic and herbs, you can ensure a perfect result every time you bake. The contrast between the buttery, soft interior and the shatteringly crisp edges makes this recipe a crowd-pleaser that fits perfectly alongside everything from hearty stews to light salads.
Start with these basics, and feel free to adjust the ingredients to suit your personal preferences. Whether you are cooking for guests or a quiet dinner at home, this reliable method for making garlic bread will quickly become one of your favorite kitchen staples.
Easy Homemade Garlic Bread With a Crispy Edge

Mastering an easy Homemade Garlic Bread With a Crispy Edge is the secret to elevating any weeknight dinner from ordinary to memorable. By focusing on the interplay between soft, buttery centers and edges that shatter upon the first bite, you create a side dish that outshines the main course.
Ingredients
- 1 loaf of crusty French bread or Italian baguette
- 1/2 cup unsalted butter, softened to room temperature
- 4 cloves of fresh garlic, minced or pressed
- 2 tablespoons fresh parsley , finely chopped
- 1/4 cup freshly grated parmesan cheese
- 1/2 teaspoon kosher salt
- 1/4 teaspoon cracked black pepper
- Optional: 1/4 teaspoon red pepper flakes for a subtle kick
Instructions
- Preheat your oven to 400°F (200°C) and line a large baking sheet with parchment paper to prevent sticking.
- Slice the bread loaf in half lengthwise, then cut those halves into smaller portions if preferred for easier handling.
- In a small mixing bowl, combine the softened butter, minced garlic, chopped parsley, salt, pepper, and red pepper flakes.
- Mash the mixture with a fork until it becomes a smooth, uniform garlic butter paste.
- Spread the butter mixture generously over the cut sides of the bread, ensuring you reach all the way to the outer crust.
- Sprinkle the grated parmesan cheese evenly over the buttered surface, pressing it gently so it adheres.
- Place the bread cut-side up on the prepared baking sheet.
- Bake in the preheated oven for 12 to 15 minutes, or until the edges are deep golden brown and the center is bubbling.
- For a truly crispy edge, turn the broiler on for the final 60 to 90 seconds of cooking, watching closely to prevent burning.
- Remove from the oven, let cool for two minutes, and slice into thick pieces before serving warm.
Similar Posts
Creamy Garlic Chicken Recipe for a Quick Family Dinner
Finding a reliable Creamy Garlic Chicken Recipe for a Quick Family Dinner can transform your weeknight routine into something special. This dish balances tender poultry with a rich, aromatic sauce that feels indulgent but comes together in under forty-five minutes. You’ll appreciate how the simple ingredients meld into a restaurant-quality meal that satisfies even the…
How to Make Fluffy Homemade Pancakes From Scratch
Learning the art of making Fluffy Homemade Pancakes From Scratch transforms an ordinary weekend morning into a cozy, memorable event. There is something deeply satisfying about whisking together basic pantry staples and watching them rise into tall, golden rounds on a hot griddle. These cakes are light, airy, and far superior to any boxed mix…
Easy Homemade Tomato Soup for a Cozy Dinner
Crafting an easy Homemade Tomato Soup for a Cozy Dinner is one of the most rewarding ways to spend an hour in your kitchen. This classic dish balances bright acidity with a comforting, velvety texture that store-bought versions simply cannot replicate. By selecting quality ingredients and allowing them to simmer together, you create a meal…
Simple Chicken Rice Recipe for a Complete Family Meal
Finding a reliable, simple Chicken Rice Recipe for a Complete Family Meal is the secret to stress-free weeknight dinners. This dish combines tender protein and fluffy grains into one pot, saving you time on cleanup while delivering comfort in every bite. Whether you are feeding hungry kids or looking for a quick meal prep solution,…
How to Make Crispy Homemade Chicken Tenders
Making Crispy Homemade Chicken Tenders is a straightforward process that yields a result far superior to anything you will find in a freezer bag. By mastering a few simple techniques for breading and heat management, you can achieve a satisfying crunch that remains light rather than greasy. Whether you prefer the deep-fried classic or a…
Crispy Oven-Baked Chicken Wings With Simple Seasoning
Preparing crispy oven-baked chicken wings with simple seasoning at home is a rewarding way to enjoy a classic pub favorite without the hassle of deep-frying. By focusing on a few foundational techniques, you can achieve a shatteringly crisp skin and juicy interior that rivals any restaurant version. This approachable method relies on basic pantry staples…