How to Make Crispy Homemade Chicken Tenders
Making Crispy Homemade Chicken Tenders is a straightforward process that yields a result far superior to anything you will find in a freezer bag. By mastering a few simple techniques for breading and heat management, you can achieve a satisfying crunch that remains light rather than greasy. Whether you prefer the deep-fried classic or a healthier baked version, this approach ensures the meat stays succulent and flavorful.
Learning the rhythm of dredging and frying turns a simple weeknight meal into a reliable comfort food staple. You will find that the secret lies in the quality of your coating and the temperature of your pan, making the entire experience of making Crispy Homemade Chicken Tenders incredibly rewarding.
- Prep time: 15 minutes
- Cook time: 30 minutes
- Total time: 45 minutes
- Servings: 4
- Calories: 420 per serving
Ingredients
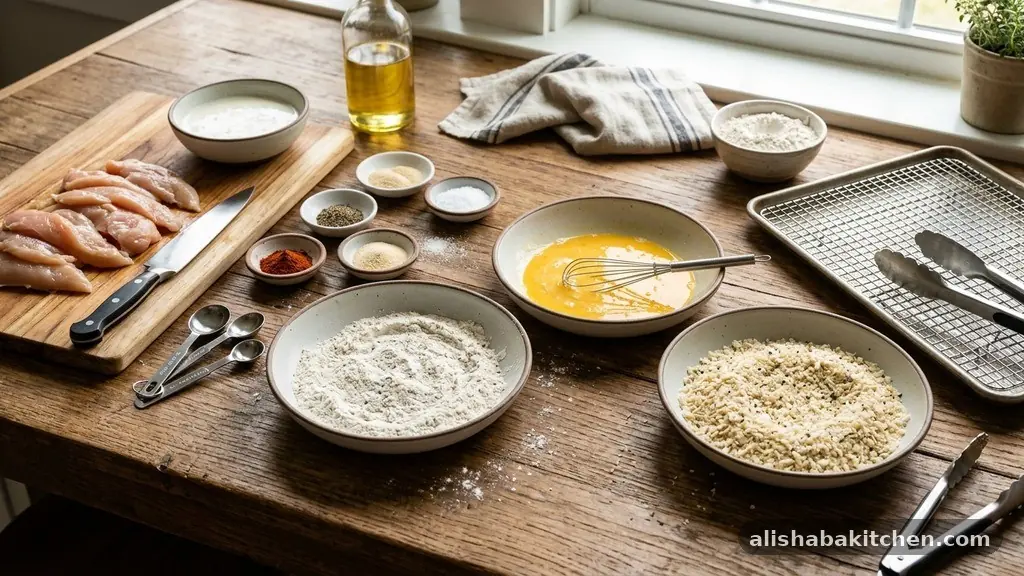
- 1.5 pounds chicken breast tenders, trimmed of any tough tendons
- 1 cup all-purpose flour
- 1 tablespoon garlic powder
- 1 tablespoon paprika
- 1 teaspoon kosher salt
- 1/2 teaspoon black pepper
- 1 cup buttermilk
- 2 large eggs, lightly beaten
- 2 cups panko breadcrumbs
- 1/2 cup finely grated Parmesan cheese
- 1/2 cup neutral frying oil, such as canola or vegetable
Instructions
- Pat the chicken tenders dry with paper towels to ensure the breading adheres properly.
- Set up a three-bowl station: place the flour, garlic powder, paprika, salt, and pepper in the first bowl and whisk to combine.
- Combine the buttermilk and eggs in the second bowl, whisking until the mixture is uniform.
- Mix the panko breadcrumbs and grated Parmesan in the third bowl, spreading them out for easy access.
- Dredge each piece of chicken in the flour mixture, shaking off the excess so only a thin, even layer remains.
- Dip the floured chicken into the buttermilk mixture, ensuring it is fully submerged and coated.
- Press the chicken firmly into the panko mixture, turning it to coat all sides thoroughly with the crumbs.
- Heat the oil in a large heavy-bottomed skillet over medium-high heat until it shimmers.
- Carefully add the chicken to the hot oil, working in batches to avoid crowding the pan.
- Cook the tenders for about 4 to 5 minutes per side, turning once, until they are golden brown and cooked through.
- Transfer the finished tenders to a wire rack set over a baking sheet to drain excess oil and maintain crispiness.
- Serve immediately while hot, perhaps with your favorite dipping sauce.
The Science of the Perfect Crunch
Achieving that signature texture requires more than just high heat. You need to manage moisture levels effectively so the breading doesn’t turn soggy as it sits.
Using panko breadcrumbs is the most effective way to ensure a light, airy crunch compared to traditional fine breadcrumbs, which can often become dense and oily. The addition of Parmesan cheese serves a dual purpose: it adds a savory depth of flavor and helps the breading crisp up more efficiently in the heat.
When you coat the chicken, the goal is to create a barrier that keeps the natural juices inside while the outside browns. If your flour layer is too thick, it can become gummy; aim for a light dusting.
The buttermilk soak is essential because it tenderizes the muscle fibers through mild acidity. This ensures that even after a quick fry, the chicken remains tender rather than rubbery or dry.
Proper temperature control is the final piece of the puzzle. If your oil is too cold, the breading will absorb the fat before it sets, resulting in a greasy mess. If the oil is too hot, the outside will burn before the center reaches a safe internal temperature.
Aim for a medium-high setting, which is generally around 350°F to 375°F. You can test the oil by dropping a single breadcrumb into the pan; it should sizzle immediately but not turn black instantly.
Choosing the Right Coating
The variety of coatings available for chicken tenders is vast, but the best approach is to stick with a classic dredge. Flour provides the base, creating a dry surface for the liquid to grip.
Without this initial layer, the buttermilk and egg wash would simply slide off the meat, leaving you with bald spots on your finished product. You can find more information about the importance of proper food preparation and safety at the USDA Food Safety and Inspection Service.
Experimenting with spices allows you to customize the flavor profile to match your personal preference. While garlic powder and paprika are standard, you might consider adding onion powder, cayenne pepper for heat, or even dried herbs like oregano.
These seasonings should always be mixed into the dry flour component. By placing the spices in the flour, you ensure they are distributed evenly across every bite of the finished chicken.
Some home cooks prefer to use cornstarch in place of half the flour for an extra-crispy exterior. Cornstarch has less protein than wheat flour, which prevents the development of gluten and keeps the coating incredibly light.
If you find your current recipe is too heavy, try swapping in a quarter cup of cornstarch next time. It is a simple modification that makes a noticeable difference in the final texture.
Managing the Cooking Environment
Whether you are pan-frying or using a deep fryer, the amount of oil you use matters. You do not need to submerge the chicken completely, but there should be enough oil to cover at least halfway up the side of the tender.
Shallow frying is highly effective and uses less oil than deep frying, making it a more practical choice for a home kitchen. The key is to maintain a consistent heat throughout the cooking process.
Avoid the temptation to move the chicken around too much while it is in the pan. Once the meat hits the hot oil, the breading needs time to set and bond to the surface.
If you flip it too early, you risk tearing the crust and releasing steam that will soften the breading. Let the chicken develop a deep golden color on the first side before attempting to turn it over.
Crowding the pan is a common mistake that leads to steamed rather than fried chicken. When you put too many pieces in at once, the temperature of the oil drops rapidly, and the moisture released from the chicken has nowhere to escape.
Work in small batches, giving each piece enough room to breathe. This ensures that the oil stays hot enough to do its job and the breading remains crisp from edge to edge.
Oven-Baked Alternatives
If you want a healthier version that still delivers a satisfying crunch, you can adapt this recipe for the oven. The trick to getting baked chicken to taste like fried chicken is to toast your breadcrumbs before you begin.
Place the panko in a dry pan over medium heat for a few minutes until they turn golden brown. This pre-toasting ensures that the breading doesn’t look pale after it comes out of the oven.
When baking, place a wire rack inside your baking sheet so that the hot air can circulate underneath the chicken. Without the rack, the bottom side will sit in its own juices and become soft.
You can also lightly spray the tops of the chicken tenders with oil or cooking spray to help facilitate the browning process. The Maillard reaction, which gives fried food its flavor and color, needs a bit of fat to occur effectively in the oven.
Bake at a higher temperature, around 400°F or 425°F, to compensate for the lack of hot oil. Keep a close eye on the internal temperature of the thickest part of the tender, aiming for 165°F.
Because the oven is a drier environment than a frying pan, you must be careful not to overcook the meat. Once the internal temperature is reached, pull them out immediately to preserve the juiciness.
Common Troubleshooting
One of the most frequent complaints is that the breading falls off during the cooking process. This usually happens if the chicken was damp when it entered the flour or if you didn’t press the breadcrumbs into the surface firmly enough.
Always pat your chicken dry with paper towels before starting the breading process. Taking that extra few seconds to remove surface moisture creates a much stronger bond between the meat and the coating.
Another issue is uneven cooking, where the outside is dark brown but the inside is still raw. This indicates that your oil heat was too high or your chicken pieces were too thick.
If you are using large breasts, slice them into uniform strips so they cook at the same rate. If the pieces are very thick, you can gently pound them with a meat mallet to ensure they are even throughout.
If you find that your chicken is tasting a bit bland, don’t be afraid to season the buttermilk mixture as well. Adding a pinch of salt and a dash of hot sauce to the liquid component adds flavor from the inside out.
Remember that the coating is the primary vehicle for your seasonings, so be generous with the salt and spices in your flour and breadcrumb mixtures. It is better to have a well-seasoned crust than a bland one.
Frequently Asked Questions
Can I make the chicken tenders ahead of time?
You can prepare the breaded chicken up to an hour before cooking, provided you keep it in the refrigerator. However, it is best to cook them fresh to ensure the panko remains as crispy as possible. If you must prepare them in advance, store the breaded, uncooked tenders on a rack in the fridge and fry them straight from the cold state.
What is the best way to reheat leftovers?
Microwaving is the enemy of crispy chicken, as it creates steam that makes the breading soggy. The best way to reheat is to place them in a 350°F oven or an air fryer for 5 to 8 minutes. This restores the crunch and warms the center without drying out the meat.
Do I need to use buttermilk?
Buttermilk is preferred for its acidity and thickening properties, which help the breading stick. If you don’t have any, you can make a quick substitute by adding one tablespoon of lemon juice or white vinegar to a cup of regular milk. Let it sit for five minutes until it slightly curdles before using it in the recipe.
Can I use gluten-free flour and breadcrumbs?
Yes, this recipe is easily adapted for those with dietary restrictions. Use a high-quality gluten-free all-purpose flour blend and certified gluten-free panko breadcrumbs. The technique remains exactly the same, though gluten-free breadings can sometimes brown faster, so keep a closer eye on the pan.
Why is my chicken rubbery inside?
Rubbery chicken is usually a sign of overcooking or using low-quality meat that has been pumped with saline solutions. Buy high-quality chicken breasts and cook them only until they reach an internal temperature of 165°F. Using a meat thermometer is the only way to be certain you are not keeping them on the heat for too long.
Final Thoughts
Mastering the art of making Crispy Homemade Chicken Tenders is a skill that pays off every time you crave a quick, satisfying meal. By focusing on the quality of your breading, the temperature of your oil, and the thickness of your meat, you can create a dish that rivals your favorite restaurant. The process is simple, clean, and allows for endless variations depending on your favorite spices and dipping sauces.
Whether you are cooking for a family dinner or a solo treat, these tenders offer a reliable and delicious result. Take your time with the dredging process, enjoy the sizzle in the pan, and serve them while they are perfectly hot and crunchy. You will quickly find that making Crispy Homemade Chicken Tenders is far better than ordering out.
How to Make Crispy Homemade Chicken Tenders
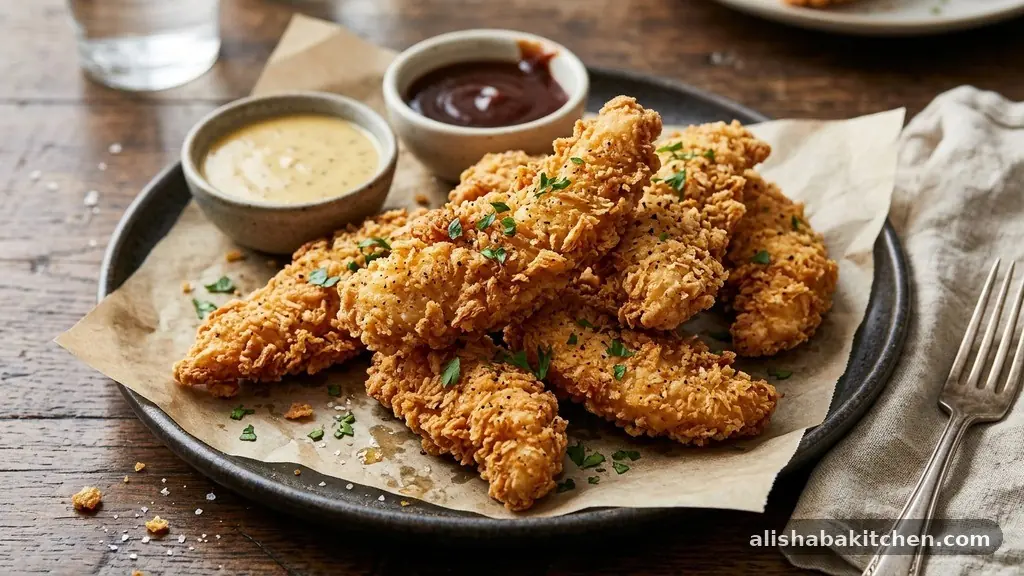
Making Crispy Homemade Chicken Tenders is a straightforward process that yields a result far superior to anything you will find in a freezer bag. By mastering a few simple techniques for breading and heat management, you can achieve a satisfying crunch that remains light rather than greasy.
Ingredients
- 1.5 pounds chicken breast tenders, trimmed of any tough tendons
- 1 cup all-purpose flour
- 1 tablespoon garlic powder
- 1 tablespoon paprika
- 1 teaspoon kosher salt
- 1/2 teaspoon black pepper
- 1 cup buttermilk
- 2 large eggs, lightly beaten
- 2 cups panko breadcrumbs
- 1/2 cup finely grated Parmesan cheese
- 1/2 cup neutral frying oil , such as canola or vegetable
Instructions
- Pat the chicken tenders dry with paper towels to ensure the breading adheres properly.
- Set up a three-bowl station: place the flour, garlic powder, paprika, salt, and pepper in the first bowl and whisk to combine.
- Combine the buttermilk and eggs in the second bowl, whisking until the mixture is uniform.
- Mix the panko breadcrumbs and grated Parmesan in the third bowl, spreading them out for easy access.
- Dredge each piece of chicken in the flour mixture , shaking off the excess so only a thin, even layer remains.
- Dip the floured chicken into the buttermilk mixture, ensuring it is fully submerged and coated.
- Press the chicken firmly into the panko mixture, turning it to coat all sides thoroughly with the crumbs.
- Heat the oil in a large heavy-bottomed skillet over medium-high heat until it shimmers.
- Carefully add the chicken to the hot oil, working in batches to avoid crowding the pan.
- Cook the tenders for about 4 to 5 minutes per side, turning once, until they are golden brown and cooked through.
- Transfer the finished tenders to a wire rack set over a baking sheet to drain excess oil and maintain crispiness.
- Serve immediately while hot, perhaps with your favorite dipping sauce.
Similar Posts
Creamy Garlic Chicken Recipe for a Quick Family Dinner
Finding a reliable Creamy Garlic Chicken Recipe for a Quick Family Dinner can transform your weeknight routine into something special. This dish balances tender poultry with a rich, aromatic sauce that feels indulgent but comes together in under forty-five minutes. You’ll appreciate how the simple ingredients meld into a restaurant-quality meal that satisfies even the…
Easy Homemade Garlic Bread With a Crispy Edge
Mastering an easy Homemade Garlic Bread With a Crispy Edge is the secret to elevating any weeknight dinner from ordinary to memorable. By focusing on the interplay between soft, buttery centers and edges that shatter upon the first bite, you create a side dish that outshines the main course. This process relies on high-heat baking…
Easy Homemade Tomato Soup for a Cozy Dinner
Crafting an easy Homemade Tomato Soup for a Cozy Dinner is one of the most rewarding ways to spend an hour in your kitchen. This classic dish balances bright acidity with a comforting, velvety texture that store-bought versions simply cannot replicate. By selecting quality ingredients and allowing them to simmer together, you create a meal…
Simple Chicken Rice Recipe for a Complete Family Meal
Finding a reliable, simple Chicken Rice Recipe for a Complete Family Meal is the secret to stress-free weeknight dinners. This dish combines tender protein and fluffy grains into one pot, saving you time on cleanup while delivering comfort in every bite. Whether you are feeding hungry kids or looking for a quick meal prep solution,…
Easy Homemade Beef Burgers With Simple Ingredients
Making easy Homemade Beef Burgers With Simple Ingredients is one of the most rewarding skills you can bring into your kitchen. You don’t need fancy equipment or a long list of obscure items to create a juicy, flavorful meal that beats any fast-food alternative. By focusing on high-quality meat and a few pantry staples, you…
How to Make Fluffy Homemade Pancakes From Scratch
Learning the art of making Fluffy Homemade Pancakes From Scratch transforms an ordinary weekend morning into a cozy, memorable event. There is something deeply satisfying about whisking together basic pantry staples and watching them rise into tall, golden rounds on a hot griddle. These cakes are light, airy, and far superior to any boxed mix…